IoT Open Basic
Basic course for IoT Open developers and integrators.
Chapter 7
“It would be really nice with some cosy relevant quote here!”
― IoT Open Developer
Node-RED
Node-RED is a fantastic tool for creating applications that reacts on changes in IoT data in near real time. In Node-RED you create flows that connects nodes that does things to the data on the way.
Node-RED was originally created by IBM and contributed as an open source project to JS Foundation and is since free for anyone to use. You can read more about Node-RED at its web page.
Installing Node-RED
Node-RED can be installed in many different ways as described on the webpage. The fastest way is to run it within docker. In the IoT Open Virtual appliance you simply run the command:
./start-node-red.shNode-RED runs on port 1880 per default. Please note that there are no authentication enabled in Node-RED when you start it so do not expose it on any untrusted network.
Installing the IoT Open Nodes
The Nodes needed to connect to Lynx is installable directly from within Node-RED.
- Click on the bars in the rightmost top corner and then click on the "Manage palette" menu option.
- Open the "Install" tab and in the search box type "iotopen". The @iotopen/node-red-contrib-lynx module will show up. Then click install.
- Some new nodes appears in the list to the right under "IoT Open".
Create your first flow connected to IoT Open
Now its time to have some fun!
The Node-RED integration and also som other integrations only lists Installation that are assigned to your account. Therefore you need to make sure the checkbox "Assign to me" is checked in the installation.
Create the "Hello World" of flows
In Node-RED data runs in flows. A flow is also the name of a workspace in Node-RED. A workspace can actually hold several flows. A flow can be very complex with several starting and ending points. Let's start with the simplest flow using the function "My Function" that we created earlier.
But first let's introduce two very useful Node-RED nodes. It is the inject
and the debug nodes. The inject node is used as a starting point of a flow
and just injects a value on the chain. It could be sent one off or repeatedly.
If you just drag it to the canvas it will inject a timestamp every time you
click on the button to the left on the node. To activate your flow click on the
Deploy button up to the right. You will need to do this whenever you change
any node.
Now you really cannot see that much so in order to visualize the data that
flows we can use the debug node. This nodes prints out things that comes to
it. So let's add a debug node as well and connect the two.
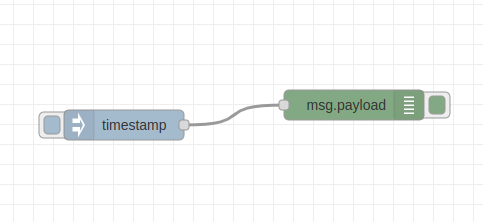
To see the output from the debug node click on the small bug up to the right (in most cases below the Deploy button) to open the debug pane to the right.
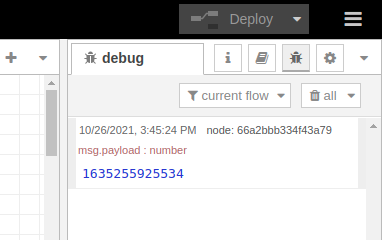
Then click on the inject node a couple of times and you should see timestamps coming to the right. This is already fun isn't it?
Let's make it much more interesting by adding some Lynx nodes.
Create a Lynx connection in Node-RED
Start by creating a new API Key from the standard user interface This is explained in Chapter 4 in case you forgot.
Then create a lynx - out node by dragging it to the canvas. Double click on
it to create your Lynx connection. In the editor for the node click on the pen
to add a new Lynx server connection. Enter the data like in the picture below.
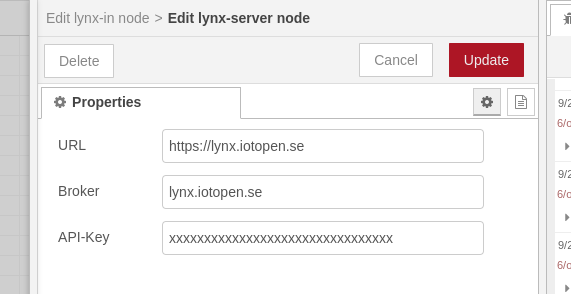
Of course you change the API Key to your key. Note that in the Broker field you just type the hostname, this will make it use a tcp-connection instead of a websocket one.
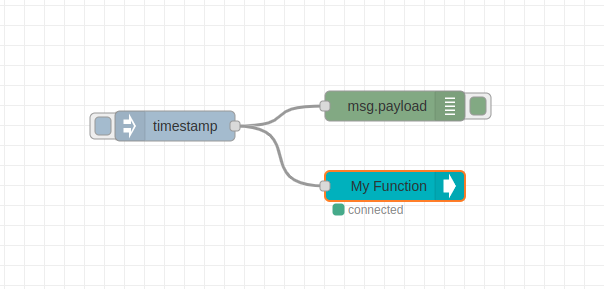
Now draw a line between the inject node and the lynx - out. You should have a
flow that looks like this.
Now, every time you press the inject node you will publish data to the function in IoT Open. Verify that it works by looking in the Workbench or in the standard user interface.
More information
The lynx - out node is a flexible node when it comes to what it publish to
IoT Open. As you know all data must be published to a topic and what topic the
node publishes to is chosen by you in the configuration box. Every meta data
wit a key that starts with topic_ will be listed with the topic_ part
stripped off.
The data that is published is also a little dynamic. If the msq.payload is a
number, that is what will be published as the value to IoT Open. If there is an
IoT Open payload with value, timestamp and possibly msg that is what will
be used instead.
In the example above we used the default timestamp of the inject node. To make
it a little more realistic we can of course change that to another value. But
make sure to use the type number to make it work. You can set any number,
even with decimals.
Get data from Lynx to Node-RED
In the example above are creating a flow starting with an inject node and send
this to IoT Open. We can of course also do it the other way around. Start with
a lynx - in node and connect it to a debug node to see the output from it. If
you use the same function as above you can see the data injected by the inject
node pass IoT Open and come back again through the lynx - in node.
Exercise
If you haven't already create the flows above. One that starts with an inject and goes to a lynx-out and one that starts with a lynx-in and goes to a debug. Use the same function in both lynx nodes and a click on the inject node should render data to the debug node. Note that a timestamp is added by IoT Open to make a full IoT Open data payload.
Once you got it read the Node-RED story on the tech pages.